RLES Guide: Difference between revisions
No edit summary |
|||
| (14 intermediate revisions by the same user not shown) | |||
| Line 2: | Line 2: | ||
==== Getting Started ==== | ==== Getting Started ==== | ||
'''Access RLES at https://rlescloud.rit.edu/''' | '''Access Old RLES at''' https://rlescloud.main.ad.rit.edu/vcac/#csp.cs.ui.catalog.list | ||
'''Access New RLES at''' https://rles-cloud.rit.edu/automation/#/service/catalog/ | |||
Sign in with your RIT computer account credentials. | Sign in with your RIT computer account credentials. | ||
You can use VMRC to access your VMs. Download the VMRC installer for your OS: | |||
* [https://solace.ist.rit.edu/~dmgics/vmrc/vmrc_windows.zip Windows] | |||
* [https://solace.ist.rit.edu/~dmgics/vmrc/vmrc_macos.dmg MacOS] | |||
===== Provisioning a VM ===== | ===== Provisioning a VM ===== | ||
When you first log into RLES, you'll land on the Catalog | When you first log into RLES, you'll land on the Overview. Go to Catalog, and you'll see all of the virtual machine images that you have access to. Click on 'Request' to provision a VM instance. | ||
On the next screen, note the option selected in the "Project" dropdown. If you're going to be using this VM in a group project, make sure your group's name is selected in this dropdown. | |||
To access a VM, you can use a browser, or you can use VMware's Remote Console (VMRC). | Update the "Description" field with a meaningful value. For example, if you're going to use this VM to test out building a LAMP stack for ISTE-444, you could enter a description of "LAMP stack for ISTE-444". Having useful descriptions will really help you out when you've got multiple VMs provisioned. | ||
Hit the "Submit" button to send the request to have your new VM provisioned. It should take a few minutes before the new VM is ready. | |||
Note: RLES VMs only persist for two months (so we don't end up with a ton of unused VMs hanging around). If you need yours longer than two months, you'll have to extend the VM's lease. | |||
===== Accessing a VM ===== | |||
RLES VMs are, by default, only accessible within RLES. To access a VM that you've provisioned, go to the "Deployments" tab and find the entry for the VM that you're looking for. | |||
RLES VMs typically automatically suspend after 6 hours in order to conserve RLES resources, so if the status of your VM is "Off", click the "Available actions" dropdown (the dot-dot-dot on the left) and choose "Power On" (then click "Submit" on the next screen). It should take a minute or so for the VM to turn back on. | |||
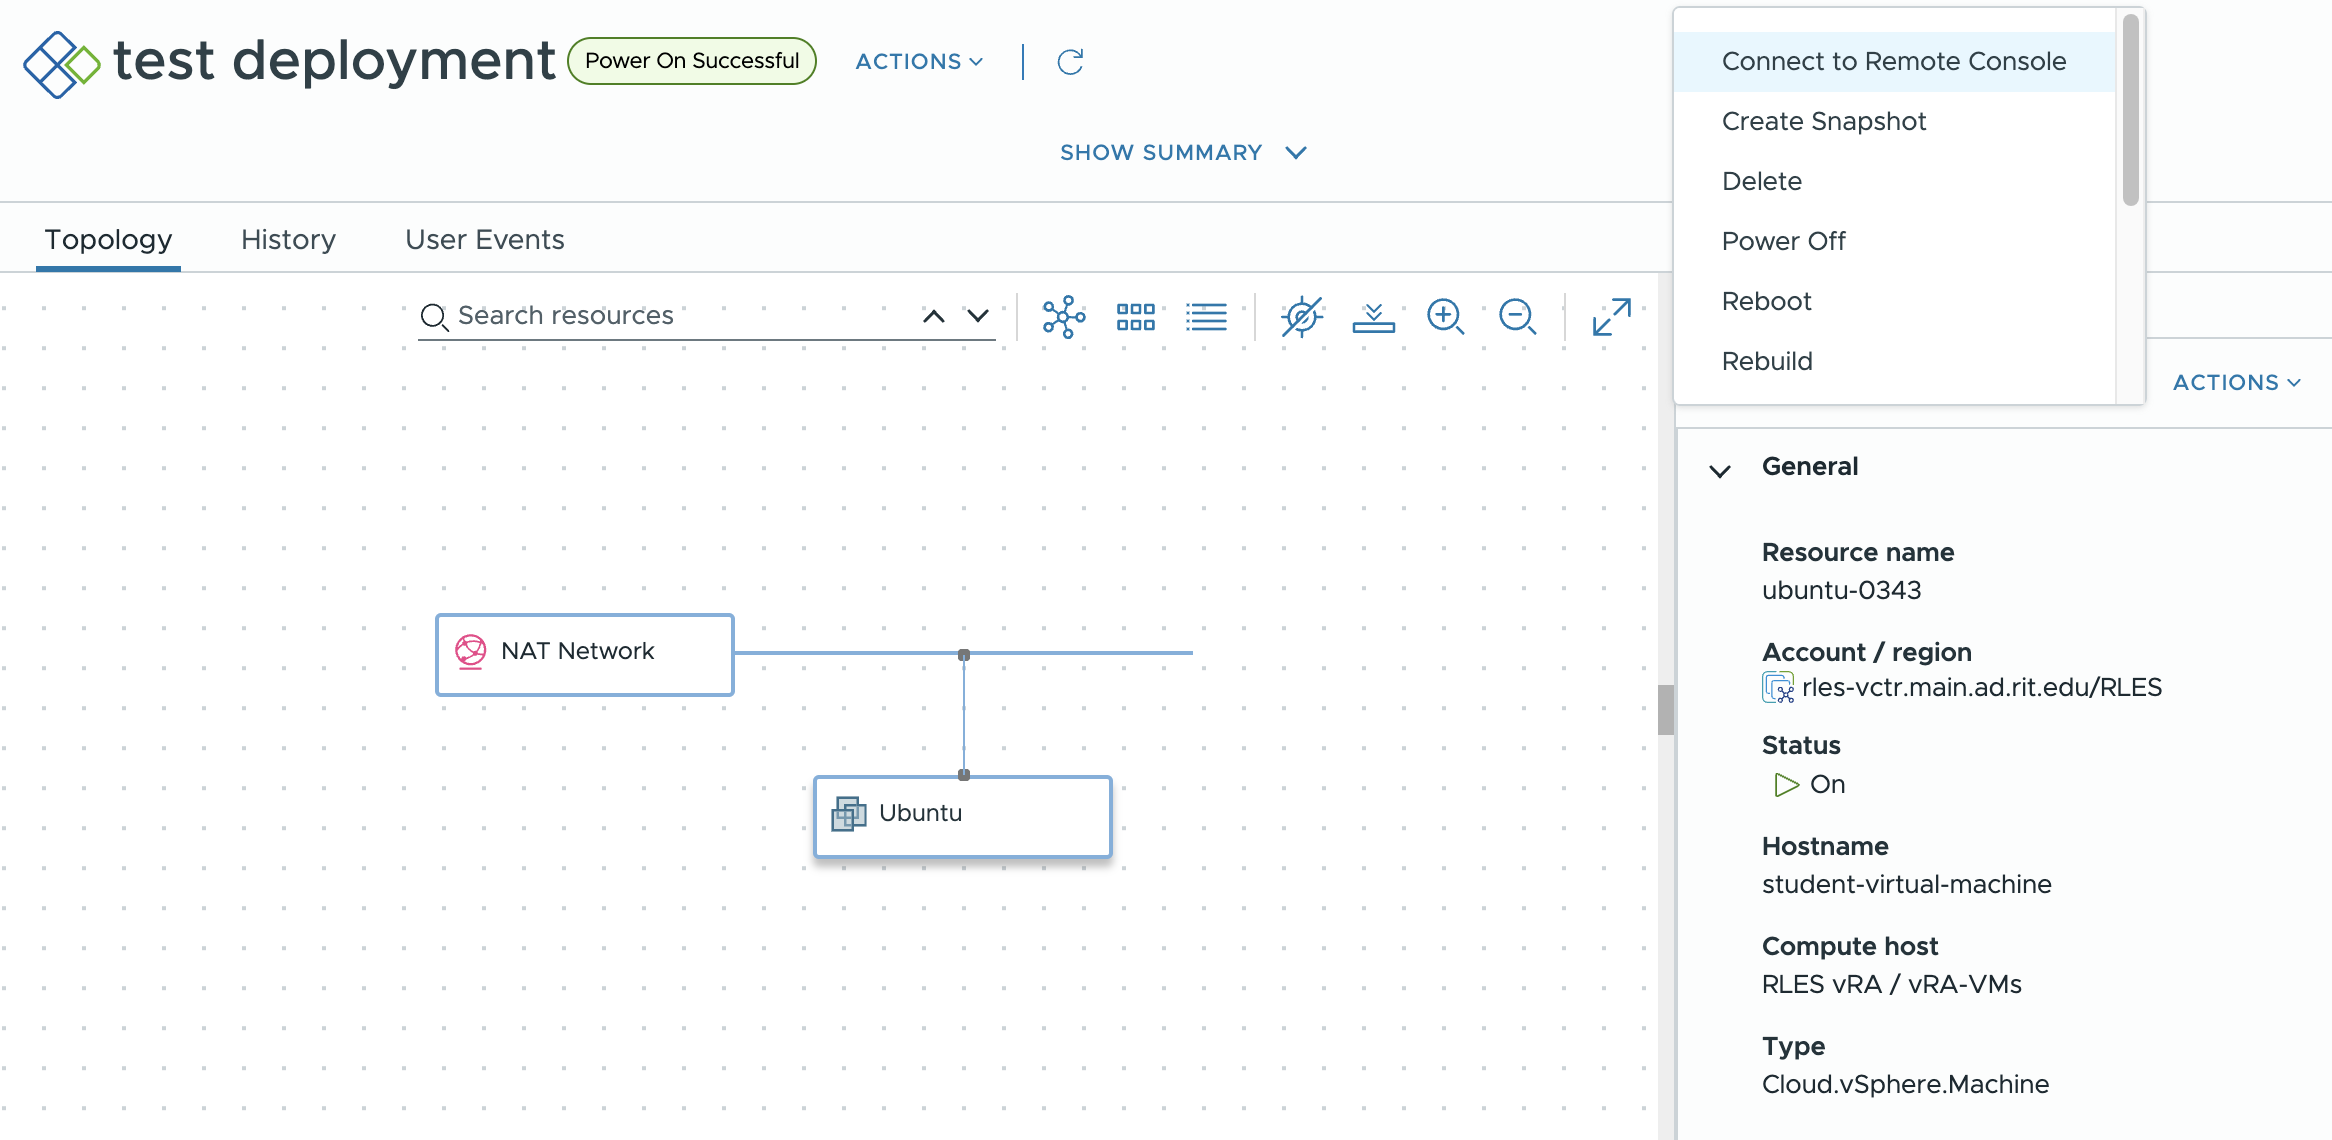
[[File:RLES actions menu.png|alt=RLES VM context menu|thumb|502x502px|RLES VM context menu]] | |||
Once a VM is powered on, click the VM's name, and then in the panel on the right, click the "Actions" dropdown to access available options. | |||
To access a VM, you can use a browser, or you can use VMware's Remote Console (VMRC). Using a browser to access the VM is quick and easy, but it won't allow for copy/pasting from your host computer. To use the browser, click "Connect to Remote Console" in the context menu. | |||
To use VMware's Remote Console, click "Connect using VMRC". A new browser tab will open with a link for connecting to the VM. If you haven't used VMRC before, click the "Download VMRC" link and follow the instructions for your operating system. Once VMRC is installed, you can click the "Connect to console using VMRC" to open your VM using the VMRC application. | |||
==== Access Outside of RLES [only for Old RLES] ==== | |||
You can request that your VM be accessible outside of RLES. To do so, send an email to gccisit@rit.edu that includes: | |||
# The '''name of your VM''' (e.g. "ubuntu-1234") | |||
# What '''port(s)''' your web server is listening on (e.g. 80, 443, 3000, etc.) | |||
# What '''hostname''' you want in DNS (e.g. "awesome-site", which will become "awesome-site.webdev.gccis.rit.edu") | |||
Once the setup is complete, you'll be able to access your site from any browser outside of RLES at:<blockquote>https://[hostname].webdev.gccis.rit.edu</blockquote>Note that a TLS certificate is automatically added by the RLES proxy, so you'll access your site over HTTPS even though you haven't configured your web server for it. | |||
You can SSH into your VM too (as long as SSH is enabled on the VM), but you must be on the RIT network to do so (note that there'll be a custom port for each VM):<blockquote>ssh [username]@[hostname].webdev.gccis.rit.edu -p[port]</blockquote> | |||
==== Group Work==== | ==== Group Work==== | ||
You should all be able to see your groups VMs; if, on the Deployments page, you don't see a VM that someone else in your group created, click the filter icon next to "Deployments" and clear the checkmark next to your name. | You should all be able to see your groups VMs; if, on the Deployments page, you don't see a VM that someone else in your group created, click the filter icon next to "Deployments" and clear the checkmark next to your name. | ||
==== Troubleshooting ==== | |||
'''VM loses connectivity'''<br>If your VM loses connectivity, try toggling the wired connection: Click the power icon in the top right corner, click "Wired Connected", and click "Turn Off". Then again click the power icon, click "Wired Off", and then "Connect". | |||
'''Freezing'''<br> | |||
If your VM appears to freeze, try exiting VMRC or your host computer's browser tab, and then reconnect to the VM. | |||
Latest revision as of 08:55, 13 November 2024
GCCIS's Remote Laboratory Emulation System (RLES; pronounced "are-less") is a virtual private network that's not accessible to the outside world, with an environment set up just for our class.
Getting Started
Access Old RLES at https://rlescloud.main.ad.rit.edu/vcac/#csp.cs.ui.catalog.list
Access New RLES at https://rles-cloud.rit.edu/automation/#/service/catalog/
Sign in with your RIT computer account credentials.
You can use VMRC to access your VMs. Download the VMRC installer for your OS:
Provisioning a VM
When you first log into RLES, you'll land on the Overview. Go to Catalog, and you'll see all of the virtual machine images that you have access to. Click on 'Request' to provision a VM instance.
On the next screen, note the option selected in the "Project" dropdown. If you're going to be using this VM in a group project, make sure your group's name is selected in this dropdown.
Update the "Description" field with a meaningful value. For example, if you're going to use this VM to test out building a LAMP stack for ISTE-444, you could enter a description of "LAMP stack for ISTE-444". Having useful descriptions will really help you out when you've got multiple VMs provisioned.
Hit the "Submit" button to send the request to have your new VM provisioned. It should take a few minutes before the new VM is ready.
Note: RLES VMs only persist for two months (so we don't end up with a ton of unused VMs hanging around). If you need yours longer than two months, you'll have to extend the VM's lease.
Accessing a VM
RLES VMs are, by default, only accessible within RLES. To access a VM that you've provisioned, go to the "Deployments" tab and find the entry for the VM that you're looking for.
RLES VMs typically automatically suspend after 6 hours in order to conserve RLES resources, so if the status of your VM is "Off", click the "Available actions" dropdown (the dot-dot-dot on the left) and choose "Power On" (then click "Submit" on the next screen). It should take a minute or so for the VM to turn back on.
Once a VM is powered on, click the VM's name, and then in the panel on the right, click the "Actions" dropdown to access available options.
To access a VM, you can use a browser, or you can use VMware's Remote Console (VMRC). Using a browser to access the VM is quick and easy, but it won't allow for copy/pasting from your host computer. To use the browser, click "Connect to Remote Console" in the context menu.
To use VMware's Remote Console, click "Connect using VMRC". A new browser tab will open with a link for connecting to the VM. If you haven't used VMRC before, click the "Download VMRC" link and follow the instructions for your operating system. Once VMRC is installed, you can click the "Connect to console using VMRC" to open your VM using the VMRC application.
Access Outside of RLES [only for Old RLES]
You can request that your VM be accessible outside of RLES. To do so, send an email to gccisit@rit.edu that includes:
- The name of your VM (e.g. "ubuntu-1234")
- What port(s) your web server is listening on (e.g. 80, 443, 3000, etc.)
- What hostname you want in DNS (e.g. "awesome-site", which will become "awesome-site.webdev.gccis.rit.edu")
Once the setup is complete, you'll be able to access your site from any browser outside of RLES at:
https://[hostname].webdev.gccis.rit.edu
Note that a TLS certificate is automatically added by the RLES proxy, so you'll access your site over HTTPS even though you haven't configured your web server for it.
You can SSH into your VM too (as long as SSH is enabled on the VM), but you must be on the RIT network to do so (note that there'll be a custom port for each VM):
ssh [username]@[hostname].webdev.gccis.rit.edu -p[port]
Group Work
You should all be able to see your groups VMs; if, on the Deployments page, you don't see a VM that someone else in your group created, click the filter icon next to "Deployments" and clear the checkmark next to your name.
Troubleshooting
VM loses connectivity
If your VM loses connectivity, try toggling the wired connection: Click the power icon in the top right corner, click "Wired Connected", and click "Turn Off". Then again click the power icon, click "Wired Off", and then "Connect".
Freezing
If your VM appears to freeze, try exiting VMRC or your host computer's browser tab, and then reconnect to the VM.

